Celebrating Friendship on World Card Making Day 2013
Welcome to a special World Card Making Day Blog Hop
post from the Design Team Members of Poppystamps. If
you are following the hop, then you arrived here from
Jeanne Jachna's blog.
post from the Design Team Members of Poppystamps. If
you are following the hop, then you arrived here from
Jeanne Jachna's blog.
Good friends are there for you in good times and bad.
Sometimes it is nice to say thank you to your friends. Is
there a better way to say thanks than with a handmade
card and a yummy candy bar?
Sometimes it is nice to say thank you to your friends. Is
there a better way to say thanks than with a handmade
card and a yummy candy bar?
The image below is the finished product. As luck would
have it, I had cardstock that complimented the colors of
the candy bar's original wrapper.
have it, I had cardstock that complimented the colors of
the candy bar's original wrapper.
Step 1: For this bar, dimensions for other bars will vary, I cut an 8 1/2 by 11" paper at 10 1/2" in length. I scored the card stock and at 3 1/4", 3 1/2", 6 3/4", 7".

To reproduce this, you will need to measure your bar and determine how wide and how thick it is to determine your sizes and scoring.
Step 2: Measure card stock to create the frame for the image. This should be slightly smaller than the base of the panel.
Step 3: Cut another piece of cardstock slightly smaller than the background panel (from Step 2) and adhere to the background panel. Here comes the fun!
Step 4: Run the run the Viva Tree Die [#903] from Poppystamps through a die cut machine on another piece of paper [color does not matter as you are not using the die cut but the empty space the die cut left behind].
Step 5: Carefully remove the tree. There will be two pieces that will fall out (see image below with arrows). These pieces will fall out as they are not connected. Simply place your template over the image panel and using a temporary glue adhesive [I used a glue dot] and gently put them back in place and begin sponging into the area left empty by the tree. Once the tree is sponged gently remove the template and the two extra pieces.
Step 6: Die cut the Sitting Cat Die [#860] by Poppystamps and use the card stock as a template and sponge a darker color for the cat. You should not need to adhere the cat template.
Step 7: Adhere your image panel [and background panel] to your candy bar cardstock wrap.
Step 8: Add the greeting - trim a piece of the ivory (or white) card stock for the greeting. I used Poppystamps So Much [CS308B] Cling Stamp. I used a marker and colored the greeting and a leaf, then I selected three other colors and colored the additional leaves and finally a brown marker for the stem. Stamp the greeting and adhere it to the colored panel slightly under the tree image to allow a little of the colored cardstock to peek through.
Step 9: Finish it! How you finish it is up to you. I chose to use a burlap ribbon and simply tied a small knot and trimmed off the ends of the ribbon. This holds the card candy bar wrapper in place. Other options include closing the wrapper with double sided tape, glue, glue dots, etc. Using a ribbon to hold the wrapper closed keeps the bar from sliding out and allows the recipient to save your sentiment.
Supplies you will need:
Supplies you will need:
Poppystamps Sitting Cat Die [#860]
Poppystamps Viva Tree Die [#903]
Poppystamps Cling Stamp: So Much [CS308B]
Cardstock (3 colors - one for the wrapper, one for the colored panel, and one for the image/greeting panel)
Burlap ribbon (or similarly colored ribbon to cardstock) to close the wrapper
Adhesives
Ink & Markers
Candybar
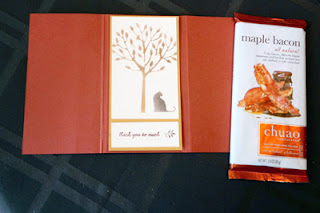
Above is a photo of the wrapper and the candy bar used.
There are three colors of cardstock used, the wrapper (Step 1), the background panel (Step 2), and the image panel where you will do the ink sponging (Steps 5 & 6). The image panel cardstock color is also used for the section where the greeting is stamped.
If you don't want to create a candy bar wrapper you can easily create a card and use this as the front panel and line the inside with a blank panel where you can personalize the card by handwriting a little note to the recipient.
Thanks for stopping by. Next time you want to say "thank you" to a friend, say it with chocolate and a great card wrapper featuring Poppystamps!
 Be sure to leave a comment on all the blogs you visit as part of this blog hop as there will be hidden prizes along the way.
 You have until midnight US EST on October 10 to leave comments. Winners will be announced on Friday, October 11. Four random winners will be selected from comments left on all the Poppystamps Designers' Blogs. Each winner will win one of the following dies:
Now that you have visited my blog [and left a comment], hop on over to check out Lezlye Lauterbach's blog. If you came directly to my blog and want to start at the beginning click Poppystamps Blog.


