Friday, March 29, 2013

Easter basket from card stock

For this basket, I used the Connie Stewart (Stampin up demonstrator) YouTube tutorial.  While not 100% the same, I modified a few elements like the embossing folder, colors, stamp, ribbon, and brads.

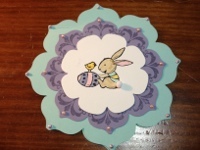
This basket was made using 1 sheet of 8 1/2 x 11 inch Wisteria Wonder cardstock.  The large scalloped ovals are from the 2013 SU! Spring Catalog Oval Framelits collection.  The handles were also made from combining two framelits and cutting that oval in half.  (For step-by-step directions look for Connie's video).

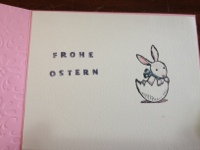
I used the Cloudy day embossing folder (yes, I like that one a lot!) and then assembled the pieces. I punched out of Blushing Bride with the modern label punch and then from Very Vanilla the stamped greeting to add some Easter-like colors.  I affixed it to the basket by using some green brads.

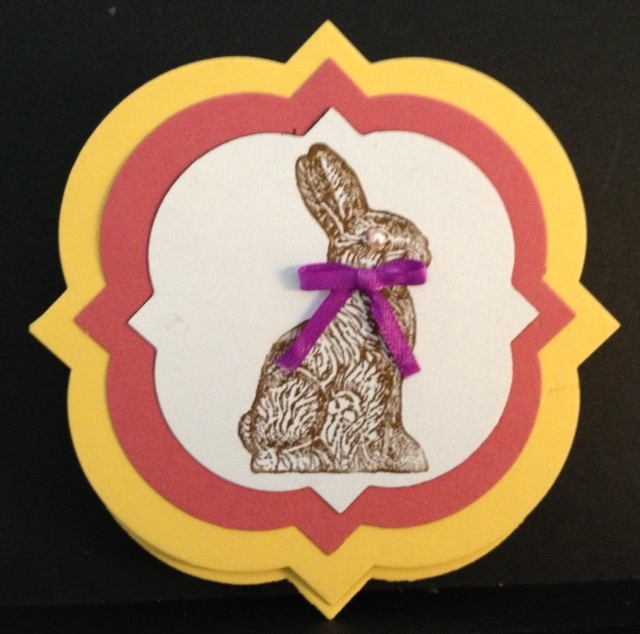
Then I added a tag with some scrap purple ribbon tied into a bow.  The tag was cut from the smallest oval in the framelits collection.  The stamp is from Impress Rubber Stamps out of Seattle and is a chocolate bunny.

Inside (not visible) I purchased recycled paper Easter grass in green and added some Lindt chocolate bunny minis and Lindt truffles along with a couple Ritter chocolate squares.  There is a string showing from the handle which has since been removed.

Cardstock:  Wisteria Wonder, Very Vanilla, Blushing Bride
Punches;  Modern Label, Word Window
Framelits:  Ovals
Accessories:  Ribbon (purple, nonSU!), Flower brads (green from Subtles Collection, SU!), stampin dimensionals (used to mount greeting).
Ink:  Early Espresso (for the bunny), Concord Crush (for the greeting)
Embossing: Cloudy Day folder (2013 SU! Spring Catalog)
Stamps:  Greeting from Everybunny (SU!), chocolate bunny (nonSU! stamp purchased from Impress Rubber Stamps)

Yet another Easter card - watercolor


I decided to try my hand at watercolor.  All items, except where noted, are from Stampin' Up!

Cardstock:  Island Indigo, Watercolor Paper (inside of card), Whisper White (oval frame)
Framelits:  Oval Framelits (Spring 2013 Catalog)
Stamp Set: Everybunny
Embossing folder:  Cloudy Day (Spring 2013 Catalog)
Die cuts:  Clouds from Impression Obsession (inside of card)
Ink colors:  Tempting Turquoise (sky), Garden Green (hills) (inside of card).
Ink colors:  Primrose Petal, Wisteria Wonder, Pool Party, Island Indigo (all SU!) and Vintage Photo from Tim Holtz Distressed Markers (on bunny).
Other tools:  Water brush, Black embossing powder, embossing heat tool

This card stock is the A2 size with the fold along the top of the card.   I used the Framelits to create the opening in the card and then embossed it with Cloudy day folder.  Afterwards I used the same Framelits and the next larger sized one to create the oval frame for the card window.

The inside of the card was made by using the Tempting Turquoise ink and the water brush to paint the sky.  Then I drew a line for the hills with Garden Green and blended with the water brush.  Once dry, I adhered the bunny on stampin dimensionals.

The bunny was also stamped on Watercolor paper and then embossed with black embossing powder before being colored with markers.  After that was dry, I cut it so it could stand out from the background of the card.

Lastly I used the greeting from the same stamp set and punched it out with the Word Window and theModern  Label punch was punched on leftover card stock and adhered with dimensionals to the card.


Vielen Dank für Ostergeschenk und Osterkarte

This card is a thank you card (so if you are reading Natalie - this is on its way to you!) for my friend who lives in Germany.  She sent me a wonderful surprise package for Easter with many wonderful things inside.  :-)

This card was made with SU! products and the sentiment Vielen Dank is stamped on the inside of the card.  Since there is nothing else inside but a personal note, I have not posted the inside view.

Cardstock:  Crumb Cake, Soft Suede, Early Espresso, Very Vanilla (inside and squares for flowers).
Ink:  Soft Suede (ivy and inside greeting), Primrose Petal and Old Olive (flower and stem/leaves).
Accents:  4 small half pearls that are cream color (or off-white).
Stamp sets:  Ivy background stamp, Oh Hello (rose only, from 2013 Spring Catalog).

The card is 4 1/4 x 5 1/2 with the seam on the left (crumb cake cardstock).
The Soft Suede card stock is the next layer and the inner rectangle.  It has been stamped with the Ivy Background stamp (retired). The exact measurements I forgot to write down but it is just a hair smaller than the cardstock.

Next, I cut out Early Espresso card stock in the large rectangle and in three 1 1/2 inch squares.
The Very Vanilla cardstock was cut into 1 1/4 inch squares.

Next, I colored on the stamp Primrose Petal on the blossom and Old Olive on the stem and leaves and stamped on the very vanilla.  Repeat this two more times to get a total of 3.

To assemble the card adhere the large stamped crumb cake to card, then adhere the crumb cake rectangle to the Early Espresso rectangle.  Afterwards adhere the rectangles to the card base (on top of the stamped Crumb Cake layer).

From here, I used glue dots to adhere the flowers to the Early Espresso squares and glue dots again to adhere the early espresso squares to the rectangles.  Lastly, I added the 4 off-white or cream colored pearl decorations.  The plan was to add a ribbon as swell (before adding the rectangles to card stock but I did not possess a complementary colored ribbon.

The last thing I did was take a 4 1/8 by 5 1/4 piece of Very Vanilla and adhere it to the inside of the card and stamp the greeting.

Thursday, March 21, 2013

Namaste

This card was sent to a very good friend as a friendship card.

Stampset: In Balance by Debbie Corbari sold by Gina K. Designs
Cardstock: Watercolor paper, Rich Razzelberry (SU!)
Ribbon: SU! Rich Razzelberry
Embossing Folder: Vines (SU! SAB 2013)

Sentiment inside: Thanks for keeping me balanced (not shown)


Easter Card - Cloudy Day

Card Stock: Watercolor Paper, Wisteria Wonder, Whisper White
Ink: Daffodil Delight, Pool Party, Whisper White, Tim Holtz Picket Fence (for eggshell), Tim Holtz Vintage Photo (bunny body), Blushing Bridge
Framelits: Scalloped Oval from SU! Spring 2013 Catalog
Embossing Folder: Cloudy Day (Spring 2013 Catalog)
Stamp sets: Everybunny

Inside (not shown) has the greeting from Everybunny as well.

Another Easter Card

Another Easter card on its way to Germany!

Card stock: Pool Party, Wisteria Wonder, Watercolor Paper
Ink Colors: Stazon Black, Whisper White, Pool Party, Daffodil Delight, Tim Holtz distressed Vintage Photo (bunny color)
Stamp sets: Daydream Medallions, Everybunny, Verspielte Grüße
Framelits: SU! Floral Framelits
Misc: Cotton ball tail sold by Impress Rubber Stamps (Seattle, WA) and mini pearls from Martha Stewart.


Easter Card - rectangular

A small Easter card using Everybunny stamp set.

Cardstock: Watercolor Paper, Daffodil Delight, Primrose Petal
Ink Colors: Primrose Petal, Daffodil Delight, Concord Crush, Not Quite Navy, Pool Party, Blushing Bride, Wisteria Wonder, Tim Holtz Vintage Photo Distressed (for bunny body).
Punches: Scallop punch for border of card.


Easter Cards

This card was made for my friend's mum. The layout was "cased" from a Stampin Up demonstrator example.

Cardstock: Whisper White, Blushing Bride, Watercolor Paper
Ink: Stazon Black, Wisteria Wonder, Pool Party, Blushing Bride,Concord Crush
Framelits: Scalloped Oval (SU! Spring Catalog 2013).
Stamp Set: Everybunny, Photopolymer (for letters)

I added Blushing Bride gathered ribbon across the front of the card up unto the white circle frame and a little piece on the other side of the circle but forgot to rephotograph prior to sending.


Tuesday, March 5, 2013

Easel Easter Card

This card is an easel card made from Stampin' Up! (SU!) products.

Cardstock: Primrose Petal, Daffodil Delight, Pearlized White
Punches used: Modern Label Punch, Word Window Punch
Framelits: From the holiday 2012 mini that is carried over called Window Frames Framelits.
Stamp sets: Happy Easter from Teeny Tiny Wishes and Chocolate Bunny
Accents: Martha Steward pearl accents, generic purple thin ribbon
Tools: (Non SU!) Bow-easy (to tie the bow) It is $4.95 and worth it if you are bow challenged as I am.

For this card I used the next to the largest framelit and cut out a single piece of yellow paper. Then I used a standard 8 1/2 x 11" paper and cut in half. Then I folded one side in half and placed the framelit just above the crease in order to get the shape and keep the card connected.

After that I used the third largest framelit in the set to cut the pink paper followed by the 4th largest framelit to cut the paper to stamp on. This is a very small window so if you have an image that is large skip the pink (or layering) framelit cut.

I used the Chocolate Bunny in brown ink to stamp on the image. I then scored the front of the attached card 1/2 way down so it would fold for the easel. Afterwards I aligned the single cut to this and glued only the overlapping section. Then I glued the remaining pink and white sections.

In order to make the easel stand, I used the modern label in pink to layer behind the word window for the greeting. To add a little bit of interest, I put two tiny lavender pearl accents on each side of the modern label, a pink pearl accent for the bunny's eye and tied a purple bow for the bunny.

To affix the greeting determine where you want the easel to display and place the greeting on dimensionals. I am not certain who will get this yet but perhaps my friend's boyfriend's daughter who is six and wanting to learn English. Natalie - don't tell if you are reading this..... :-)